These 10 Easy Yoga for Sciatica Poses Will Soothe Your Lower Back Pain
Simple stretches send pain packing.

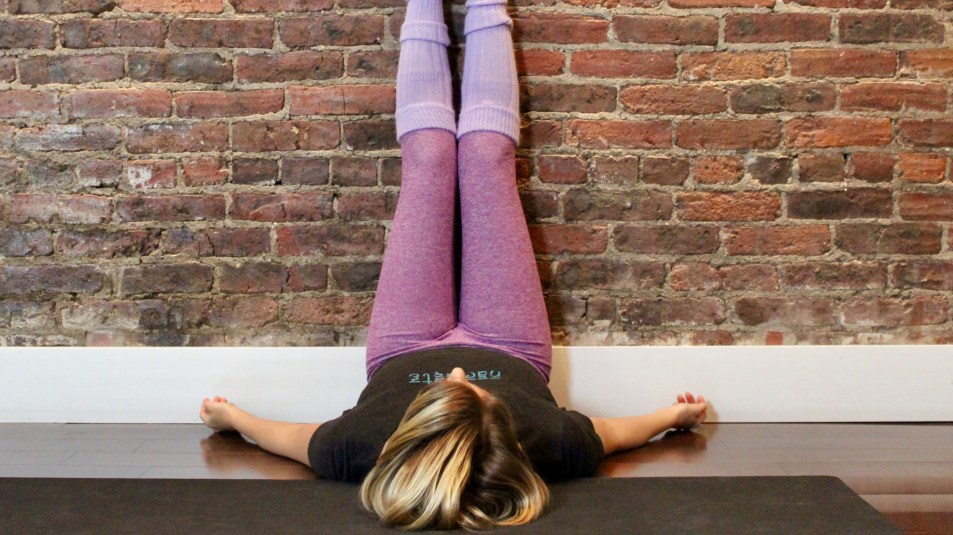
Sciatica and lower-back pain are certainly no joke. If you struggle with one or both, you know the toll they can take on your mood, your productivity, and your general well-being — but you don’t have to continue to suffer. This yoga for sciatica routine can help.
These days, we all spend a lot of time sitting. Inevitably, that means the vertebrae in our lower spine and the muscles in our lower back, hips, and glutes take a lot of pressure on a daily basis. This can lead to chronic pain and sciatic trouble. The good news is, yoga can help.
If you’ve never practiced yoga or don’t identify yourself as an athletic person, not to worry. The simplest postures can help you both strengthen and lengthen key muscles involved in sciatica and lower back pain. The key is to honor where your body is, STOP if you’re feeling intense or sharp pain, and of course, breathe as deeply as you can to encourage the muscles to soften. Check out the yoga for sciatica stretches below.

ARNICARE FOR PAIN AND BRUISES!
Powered by Arnica montana, Arnicare® is designed to treat muscle pain, swelling, and discoloration from bruising. The unscented gel cools on contact and absorbs quickly into your skin, leaving no sticky or greasy residue, and provides you with the relief you seek. Learn more at Arnicare.com.
-
Standing Forward Fold
Lara Alexiou This pose might seem really simple, but the weight of gravity pulls the torso down towards the ground, helping the entire spine to get longer. Not only that, but the lower back, hips, and hamstrings are released by the opposing force of your feet on the ground. For added benefits, do this pose against a wall! To practice:
- Begin standing straight and inhale the arms up overhead. As you exhale, fold down from the hips over your legs with your knees slightly bent.
- Make sure to keep the spine as straight as possible as you lower down. Engage the core and upper thighs, bringing the forehead toward the knees.
- On each inhale, fill your belly up with air. On each exhale, fold down a little deeper. Stay in the posture for five to 10 breaths.
-
-
Tabletop Position (All Fours)
Lara Alexiou Holding a tabletop position can help you strengthen your back muscles and your core, which supports the vertebrae in your back for better posture and spinal health. To practice:
- Come onto your hands and knees, taking a hips-width distance (or two fists) between the knees. Make sure that your hips are stacked right on top of your knees and your shoulders are stacked on top of your wrists.
- Gaze out in front of you to keep your neck long. You will probably notice your head sinking down a bit here. Press down firmly into your shins and hands and lift the back of the neck toward the ceiling while drawing the crown of your head forward.
- On your inhales, completely fill the belly, ribs, and chest with air. On your exhales, press down firmly into the ground while you draw the lower belly in and the ribs together to engage. Breathe here for five to 10 breaths.
-
Lizard Pose
Lara Alexiou This posture helps to stretch out the hips, hamstrings, groin, and hip flexors.
To practice:
- Starting on hands and knees, bring your right foot to the outside of your right hand.
- Slide your left leg back as far as it will go so that the area above your knee is resting on the floor.
- If this is a lot of sensation, stay here for five breaths with your palms planted on the floor. If you’re feeling open enough, lower down to your forearms. For an even more restorative posture, you can use a pillow to support your head here and relax. Stay in this pose for at least five breaths, then repeat on the other side.
-
Pigeon Pose
Lara Alexiou Pigeon pose gets deep into the muscles of the hamstrings and glutes, helping to release the lower back and hips. To practice:
- Start in a tabletop position.
- Bring your right knee towards your right wrist and your right ankle towards your left wrist and reach your left leg straight out behind you. The aim is to eventually get your right knee to be exactly perpendicular to your hip, but don’t force your leg further if there is sensation or pain in the knee.
- Placing your hands on the sides of your hips, sit up tall and inhale deeply, feeling your sitting bones reaching toward the ground, spine straight.
- Exhale as you fold over your front leg. Stay in the pose for five to 10 breaths. Repeat on the other side.
TIP: This pose can be intense if your hips or back are really tight, so if it feels like too much, take the pose lying on your back with both legs bent, feet on the floor. Rest your right ankle on your left knee. Thread your hands underneath your left thigh to pull the left leg in toward you while pushing the right knee away from you. Breathe deeply and repeat on the other side.
-
Bridge Pose
Lara Alexiou Bridge pose helps to strengthen the back muscles, the glutes, and the lower abdominal muscles which support the spine. Practicing this pose as little as three times a week can significantly reduce back pain!
- Begin lying on your back. Draw your knees in and place your feet down so the knees are facing up and your heels are down as close to your bottom as you can get them.
- On an inhale, lift your hips up toward the ceiling, pressing your feet firmly into the floor.
- On your exhale, draw the belly in and lift your hip bones up a little higher and draw your shins forward.
- Stay in the pose for five to 10 breaths.
-
Fire Log Pose
Lara Alexiou Fire log pose is one of the best postures for getting into those hard-to-reach areas of the hips and hamstrings, which are key places to focus on if you’re struggling with sciatica. To practice:
- Begin sitting with your legs out in front of you.
- Bring each leg in toward you (as though you were going to sit cross-legged), and stack your right leg on top of the left leg with your right ankle on top of the left knee. The aim is for knee, hip, and ankle to form a ninety-degree angle, but if your legs are bent a bit, that’s OK too.
- Sit up straight, and breathe deeply into the hip. Stay here for at least five, deep breaths, then repeat on the other side.
TIP: If this version of the pose is too intense, try just sitting cross-legged with one ankle stacked on top of the other (make sure to sit up tall and breathe.) For an even deeper stretch, inhale your arms up over your head, then exhale and fold over your legs.
-
Seated Spinal Twist
Lara Alexiou This version of a spinal twist will help relieve the muscles on the outside of the hips as well as the hamstrings. It will also help to “rinse” the vertebrae in the spine with fresh blood. To practice:
- Begin seated with your legs straight out in front of you, sitting up tall.
- Bend your right knee in so that the sole of your foot is on the ground, then place the right foot down over the left knee.
- On an inhale, draw both of your arms up above your head.
- On an exhale, twist over to your right side, placing your right hand down on the ground behind your hips like a kickstand to keep your back up straight.
- Use your left arm to grab hold of the right knee, drawing the knee toward the left armpit to gently pull yourself deeper into the twist.
- On each inhale, sit your spine up taller. On each exhale, twist over a little more.
- Stay in this pose for five to 10 breaths, then perform on the other side.
-
Child's Pose
Getty Images Child’s pose is one of the most soothing yoga postures out there for hip and back troubles. To practice:
- Starting on hands and knees, walk your knees out wide.
- Rest your bottom down onto your heels and bow your upper body forward and down. You can either extend your arms out in front of you or bring them along your sides toward your heels.
- Rest your forehead down and breathe deeply into the back body, pressing the hips down into the heels actively.
- Stay here for five to 10 breaths.
-
Legs up the Wall
Lara Alexiou One of the yummiest yoga poses out there, legs up the wall is super restorative for the tired, stiff muscles in the legs and hips. Trust us, once you're in it, you'll want to stay for a while! To practice:
- Sit up tall with your right side up against a wall. You can also place a pillow against the wall and sit on top of it.
- Keeping your hips in contact with the wall, turn your body to the right slowly and bring your legs up onto the wall using your hands for support.
- Lower your torso down and roll your shoulder blades back and down, ensuring that you’re keeping your spine nice and long and not crunching your neck.
- Bring your arms out alongside you with your palms facing up. Stay here for five to 10 breaths.
-
Savasana
Lara Alexiou And last but not least, one of the most important aspects of pain relief is taking adequate time to rest. Savasana, or corpse pose, is your chance to allow your body to absorb all the healing powers of the postures you just practiced. To get into corpse pose:
- Lay down gently flat on your back with your palms facing up, extending the legs in front of you and arms alongside the body.
- Keep the legs a bit wider than hip-width distance, and let the feet splay out to the sides comfortably.
- Close your eyes and relax deeply into the posture, taking full, deep breaths into the belly.
- Thank yourself for the effort you put into your body and well-being today. Stay in this pose for five minutes, breathing intentionally.